Python OpenCV Utilities
Useful extensions for OpenCV that you can use as a drop-in replacement for cv2.
import cv2u as cv  # instead of: import cv2 as cv

src = cv.imread("image.jpg")  # plain OpenCV
dst = cv.rotateEx(src, 45)  # cv2u extension
Installation
Choose the OpenCV distribution with an extra:
pip install "python-opencv-utils[opencv]"            # opencv-python
pip install "python-opencv-utils[headless]"          # opencv-python-headless (servers, Docker; no GUI)
pip install "python-opencv-utils[contrib]"           # opencv-contrib-python
pip install "python-opencv-utils[contrib-headless]"  # opencv-contrib-python-headless
pip install "python-opencv-utils[opencv,cluster]"    # also scikit-learn (meanShiftColors, dbscanColors, clusterPoints)
If the project already has OpenCV installed, pip install python-opencv-utils without an extra uses it.
The optional cluster extra adds scikit-learn for meanShiftColors, dbscanColors and clusterPoints.
| Python | 3.11 – 3.15 |
| OpenCV | 4.10+ and 5.x, any distribution (normal, headless, contrib) |
| NumPy | 2.0+ |
One OpenCV distribution per environment
All OpenCV distributions provide the same cv2 module and conflict with each other, so install only one of them.
import cv2u raises an ImportError with these instructions if no cv2 (or one older than 4.10) is found.
On a headless build, imshowEx fails just like cv.imshow; everything else works.
How it works
The official OpenCV Python tutorials import the module
as import cv2 as cv. cv2u follows the same pattern:
- Every attribute that
cv2udoes not define is looked up oncv2at runtime, socv.imread,cv.COLOR_BGR2GRAY,cv.dnnand so on work as usual. - Type checkers and IDEs see OpenCV's own signatures too, so autocompletion and type checking keep working.
Names added in OpenCV releases newer than 5.0 are typed as
Any. - If a name exists in both, the
cv2uversion wins. The original module is always available withimport cv2.
Examples
Everyday helpers
import cv2u as cv

src = cv.imreadEx("C:/사진/고양이.jpg")  # cv.imread fails on non-ASCII paths on Windows
small = cv.resizeEx(src, width=640)  # keeps the aspect ratio
boxed, scale, (left, top) = cv.letterbox(src, (640, 640))  # fit + pad, e.g. for a model input
logo = cv.imread("logo.png", cv.IMREAD_UNCHANGED)  # BGRA with transparency
stamped = cv.overlayImage(small, logo, org=(10, 10), alpha=0.8)
cv.imwriteEx("C:/사진/비교.png", cv.hconcatEx([small, stamped], gap=8))
Video and notebooks
import cv2u as cv

print(cv.videoInfo("input.mp4"))  # VideoInfo(width=1920, height=1080, fps=30.0, frameCount=900)
edges = (cv.autoCanny(frame) for frame in cv.readFrames("input.mp4", step=2))  # every 2nd frame
cv.writeVideo("edges.mp4", edges, fps=15)  # codec, size and color mode are detected

corners = [[120, 80], [980, 140], [940, 760], [90, 700]]  # e.g. from cv.approxPolyDP, in any order
page = cv.fourPointTransform(cv.imread("photo.jpg"), corners)
cv.imshowInline(page)  # in Jupyter, with the correct colors
Detection and web results
import cv2u as cv

img = cv.imread("street.jpg")
detections = [((40, 60, 120, 200), "person", 0.94), ((200, 90, 160, 110), "자동차", 0.88)]
crops = []
for box, name, score in detections:
    crops.append(cv.cropRect(img, box, margin=10, fill=0))  # safe even at the image border
    cv.drawLabel(img, box, f"{name} {score:.2f}", (0, 200, 255), fontPath="C:/Windows/Fonts/malgun.ttf")

hsv = cv.cvtColor(img, cv.COLOR_BGR2HSV)
red = cv.inRangeEx(hsv, (170, 80, 80), (10, 255, 255))  # red wraps around hue 0
cv.imwrite("result.png", cv.montage([img, cv.overlayMask(img, red, (255, 0, 255)), *crops], gap=8))

payload = {"image": cv.imencodeBase64(img, ".jpg", dataUri=True)}  # for a JSON API or an HTML <img>
Training data
import cv2u as cv

img = cv.imread("train/0001.jpg")
size = (img.shape[1], img.shape[0])
boxes, classIds = cv.readYoloLabels("train/0001.txt", size)  # normalized rows -> pixel (x, y, w, h)
img, boxes = cv.randomFlip(img, horizontal=0.5, boxes=boxes, seed=1)  # the boxes follow the image
img, boxes = cv.randomRotate(img, maxAngle=10, boxes=boxes, seed=1)
img = cv.randomHSV(cv.addNoise(img, "gaussian", seed=1), hue=10, seed=1)
cv.writeYoloLabels("aug/0001.txt", boxes, classIds, size, makeDirs=True)
cv.imwriteEx("aug/0001.jpg", cv.jpegArtifacts(img, quality=40))

tiles = cv.imreadAll(["train/0001.jpg", "train/0002.jpg", "train/0003.jpg", "train/0004.jpg"])
labels = [cv.readYoloLabels(f"train/{i:04d}.txt", (t.shape[1], t.shape[0]))[0] for i, t in enumerate(tiles, 1)]
big, bigBoxes = cv.mosaic(tiles, (640, 640), boxes=labels, seed=1)  # YOLO-style 4-image mosaic
polygons = cv.maskToPolygons(cv.binarize(img, "otsu", invert=True))  # COCO polygons from a mask
rle = cv.rleEncode(cv.polygonsToMask(polygons, size))  # and uncompressed RLE, no pycocotools needed
Running a model
import cv2u as cv

net = cv.dnn.loadModel("C:/모델/yolov8n.onnx")  # Unicode path; FileNotFoundError instead of a C++ assertion
names = cv.dnn.readClassNames("coco.names")
img = cv.imread("street.jpg")
blob, info = cv.dnn.preprocessImage(img, (640, 640))  # letterbox + blob; info remembers the geometry
output = cv.dnn.inferImage(net, blob)[0]  # every output layer, not just the first
dets = cv.dnn.postprocessDetections(
    output, info, scoreThreshold=0.3
)  # YOLO rows -> Detections(boxes, scores, classIds)
cv.imwrite("result.png", cv.dnn.drawDetections(img, dets, names))  # boxes on the original image
Everything else in cv.dnn (cv.dnn.readNet, cv.dnn.blobFromImage, cv.dnn.NMSBoxes, ...) is passed through from OpenCV.
Video tools
import cv2u as cv

fps = cv.FPSCounter()
with cv.VideoReader("input.mp4") as video, cv.VideoWriterEx("out.mp4", fps=video.fps) as writer:
    video.seekTime(5.0)  # start at 00:05
    for frame in video:
        fps.tick()
        writer.write(cv.drawFPS(cv.autoCanny(frame), fps.fps))  # codec, size and color mode from the first frame

cuts = cv.detectScenes("input.mp4", threshold=30)  # frame indices where a new shot starts
print([cv.formatTimestamp(cv.frameToTime(i, video.fps)) for i in cuts])  # "00:00:12.400", ...
cv.extractFrames("input.mp4", "frames/", step=30, ext=".png")  # one file every 30 frames
cv.videoToGif("input.mp4", "preview.gif", fps=10, size=(320, 180), maxFrames=50)
cv.imwrite("sheet.jpg", cv.videoThumbnail("input.mp4", count=6, cols=3))  # contact sheet
Documents and quality
import cv2u as cv

photo = cv.imread("receipt.jpg")
page = cv.scanDocument(photo)  # detect the page, warp it upright, clean the background
mask = cv.sauvolaThreshold(page, invert=True)  # local threshold for OCR, no contrib module needed
for x, y, w, h in cv.detectTextLines(page):  # one box per text line, top to bottom
    cv.drawDashedRectangle(page, (x, y, w, h), (0, 160, 255))

stats = cv.imageStats(photo)  # ImageStats(width, height, channels, dtype, mean, std, ..., sharpness, entropy, isGray)
if cv.isBlurry(photo) or cv.isBlank(photo):
    print("retake:", stats.sharpness, stats.contrast)
cv.imwrite("compare.png", cv.compareImages(photo, page, mode="side", labels=["photo", "scan"]))
rotateEx
Rotates an image without cropping its corners. The canvas grows to fit the result.
import cv2u as cv

src = cv.imread("image.jpg")
dst = cv.rotateEx(src, 45)
| src | dst |
|---|---|
 |
 |
Masks, contours and templates
import cv2u as cv

scan = cv.cropToContent(cv.imread("scan.png"), tolerance=10)  # drop the white margin
mask = cv.inRange(cv.toGray(scan), 0, 100)  # dark ink; toGray works whatever the input is
mask = cv.fillHoles(cv.removeSmallObjects(mask, minArea=30))
for contour in cv.findContoursEx(mask, minArea=500)[:3]:  # the 3 largest shapes
    cv.drawLabel(scan, cv.boundingRect(contour), f"{cv.contourArea(contour):.0f} px", (0, 160, 255))

for x, y, w, h, score in cv.findTemplate(scan, cv.imread("logo.png"), threshold=0.9):
    print(f"logo at ({x}, {y}), score {score:.2f}")
cv.imwriteEx("out/annotated.png", scan, makeDirs=True)  # cv.imwrite would return False: no "out" folder
Color clustering
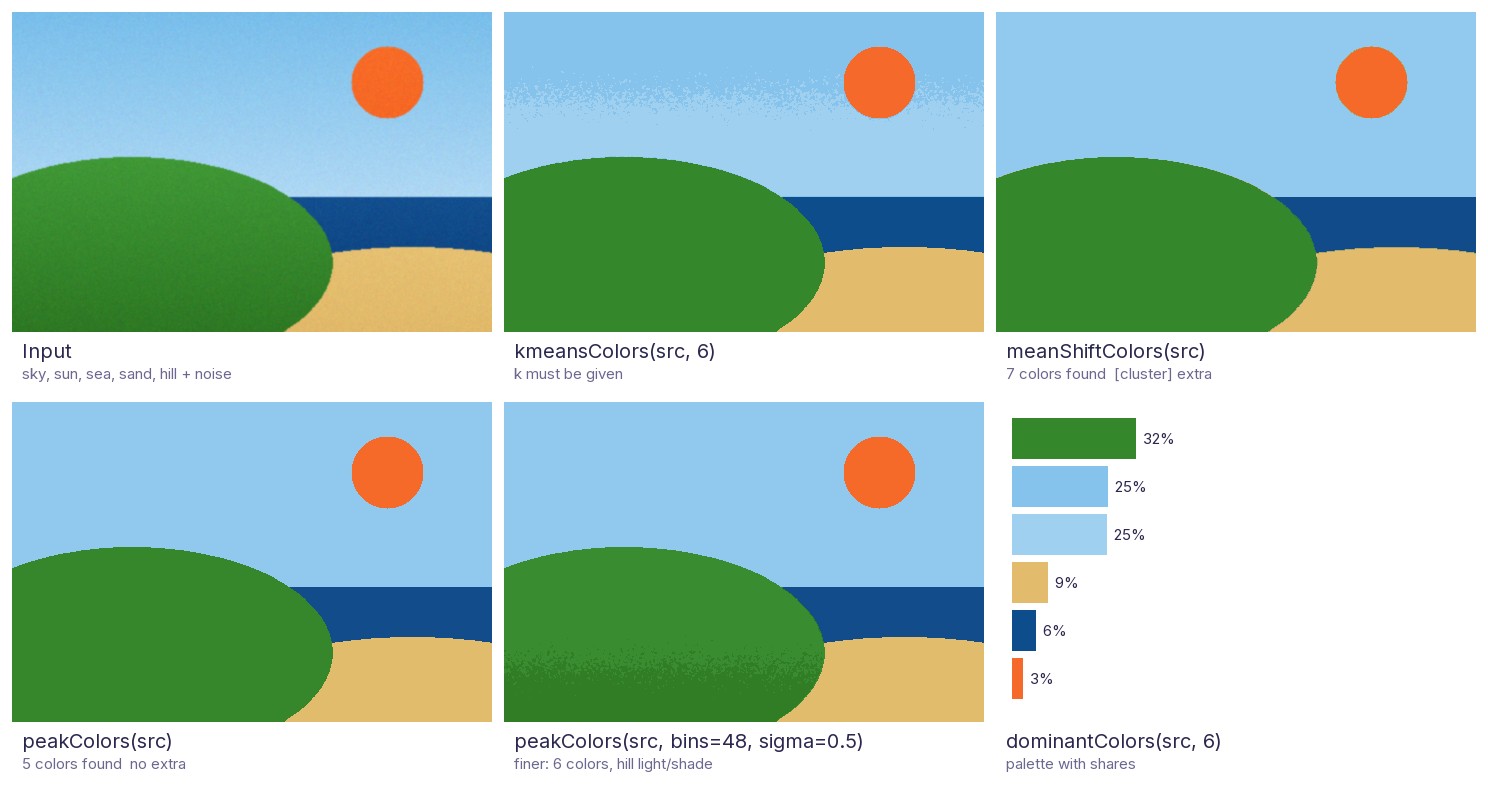
Every color clustering returns (maps, centers): a label image and one color per label, so centers[maps] paints
the result. They differ in how the number of colors is chosen:
kmeansColors |
meanShiftColors |
peakColors |
|
|---|---|---|---|
| Number of colors | You give k |
Found automatically | Found automatically |
Needs the [cluster] extra |
No | Yes | No |
| Deterministic | Yes (seed) |
Yes (seed) |
Yes (no randomness at all) |
| Pixels used to fit | A sample | A sample | Every pixel |
| 1 MP / 12 MP image | 0.25 s / 3.0 s | 0.53 s / 2.7 s | 0.13 s / 1.5 s |
Timings: the scene above at 1200x800 and 4200x2800, best of 3 runs, on one Windows PC with Python 3.14; use them to compare the methods, not as absolute numbers.
peakColors is cv2u's own method: it counts the pixels in a 3-D Lab color histogram, smooths it, and follows every
histogram cell uphill to its peak; each peak becomes one color. Identical colors, which are very common in 8-bit
images, simply add up, so it neither needs a sample nor splits flat colors apart. In the comparison it found the
5 regions of the scene, where kmeansColors (with a fixed k=6) cut the sky gradient with a noisy band, and
meanShiftColors added two clusters of 421 and 79 pixels. bins and sigma make it finer or coarser, and
minRegion absorbs small speckles into the surrounding region.
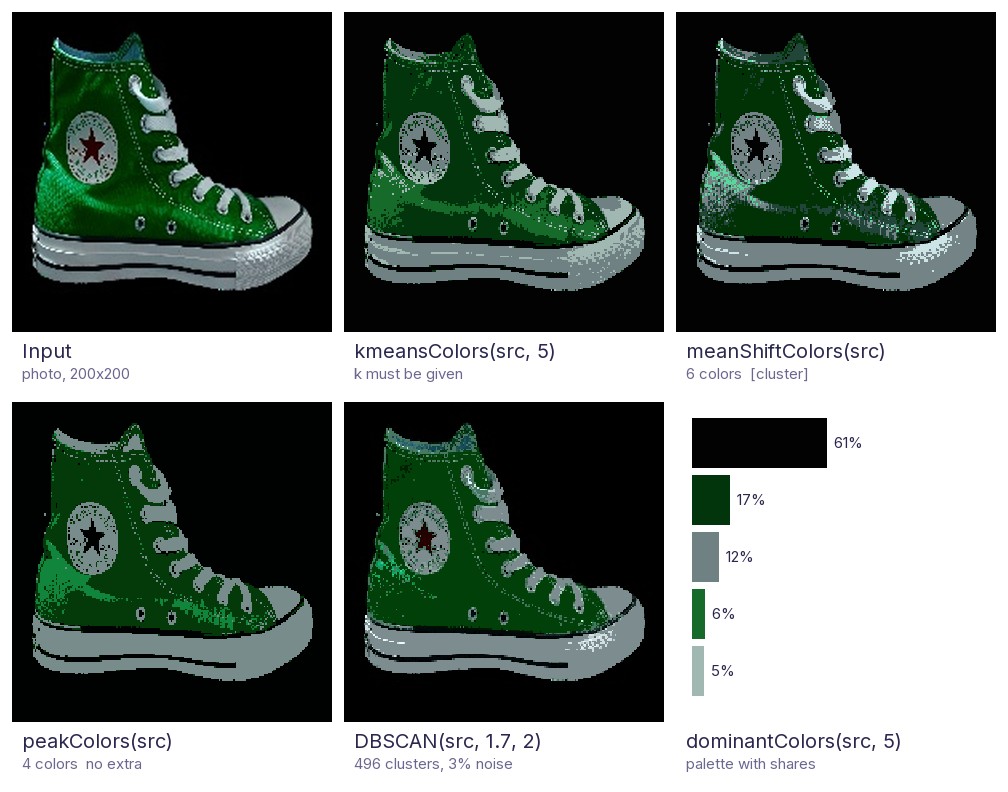
On a real photo of a sneaker, peakColors separates background, the dark and bright
greens and the white parts into 4 clean regions. meanShiftColors finds 6 colors but leaves the surface
speckled, and dbscanColors with eps=1.7 splits the image into 496 tiny clusters, which mostly reproduces the input.
Note that the dark-red star (15 pixels, 0.04% of the image, almost black) merges into the background with every
color clustering except that very fine dbscanColors; details this small are below what a palette can keep.
import cv2u as cv

img = cv.imread("photo.jpg")
maps, centers = cv.peakColors(img)  # number of colors found automatically, no extra needed
print(len(centers), "colors")
segmented = centers[maps]

for (b, g, r), share in cv.dominantColors(img, k=5):  # a palette
    print(f"#{r:02x}{g:02x}{b:02x} {share:.0%}")
poster = cv.colorQuantize(img, 8)
See the API reference for every function.